

Follow these easy steps to install your Rogers Xfinity Gateway modem (Gen 2).
Easy Setup Guide – Rogers Xfinity Gateway Modem (Gen 2)
What's Included?

Coax Cable
Rogers Xfinity Gateway modem (Gen 2)
Power cable/adaptor
Choosing the best place for your modem
Here are some tips for finding the best place for your Gateway modem:
DO place your Gateway in the most central location in your home where you have a cable outlet.
DO make sure your Gateway is raised on a shelf or table.
DON’T place your Gateway on its side, stacked on top of other electronics or close to electrical panels/power bars – this can cause signal interference.
DON’T place your Gateway inside cabinets or behind furniture – this can cause overheating.
DON’T place your Gateway next to speakers or wireless electronics/appliances, or materials like metal, concrete, mirrored surfaces or glass – these can absorb or reflect the WiFi signal.
Learn more or watch a short video about where to put your modem.
Connecting your Gateway and home WiFi
- Sign in to the Rogers Xfinity app using your MyRogers username and password.
- If the Get Started screen does not appear right away, select the Account tab then Activate Rogers Xfinity Gateway.
- Connect your Gateway as shown on-screen using the coax cable, and power adapter provided. Avoid using electrical outlets controlled by a dimmer or wall switch.
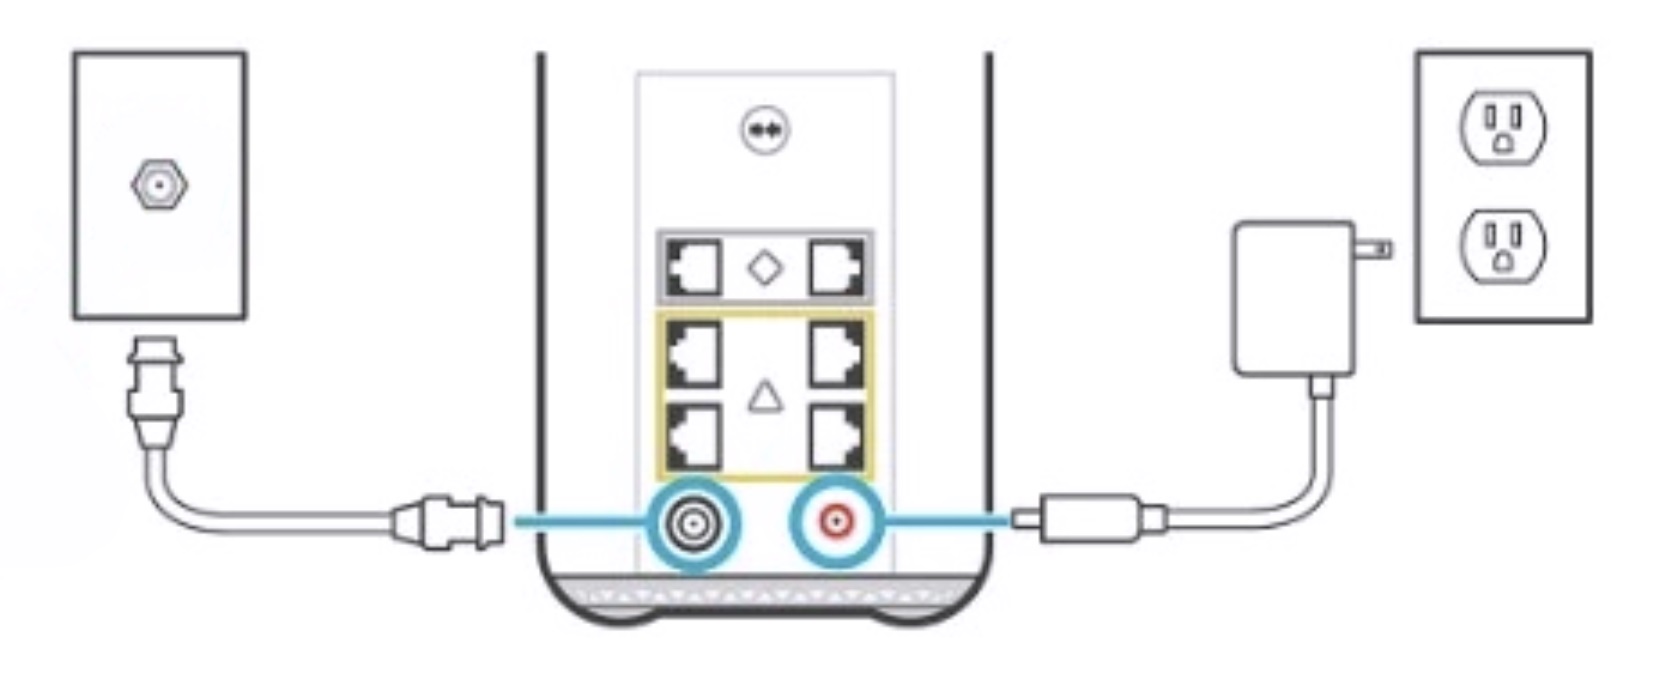
Optional: For gaming consolers or other devices with an Ethernet port, you can plug the Ethernet cable provided directly into the back of your Gateway and connect the cable to your device. - Wait about 5 minutes for the setup to finish. Within 5 minutes, the light on your Gateway should flash and turn orange, then green, then turn either solid or blinking white.
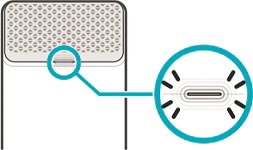
If the light doesn’t turn white after 5 minutes, try another cable outlet in your home, keeping in mind the Gateway placement tips to maximize WiFi coverage.
If the light flashes orange/green (alternating), a software update has been automatically initiated, which can take up to 20 minutes.
-
To finish setting up, connect all your devices to your new network, then use the Rogers Xfinity app to test your speed and personalize your WiFi controls. Don’t forget to turn on Advanced Security for intelligent cyberthreat protection.
Important: Ordered Rogers Voice with your service? As soon as your Gateway is connected, your old Home Phone service will automatically disconnect, and you can connect your phone to the back of your Gateway instead of a wall jack.


Connecting devices via Ethernet
If preferred, you can connect devices like gaming consoles directly to your Gateway via an Ethernet cable.
Connect one end of the Ethernet cable to the Ethernet port on your device.
Connect the other end of the Ethernet cable to the Ethernet port on the back of your Gateway.
That’s it!
For more information, visit www.rogers.com/internet-support.
Testing your internet speed
You can test your internet speed using the Rogers Xfinity app with the following steps:
-
Sign in to the Rogers Xfinity app using your MyRogers username and password.
-
If you’re a Rogers Together With Shaw customer, download the Rogers Xfinity app (Shaw) and sign in with your Shaw ID username and password.
-
Select the WiFi tab, then the Troubleshoot shortcut button.
-
Select Test your whole home network.
-
The Troubleshoot tool will begin testing the current total speed to your home gateway for all your connected devices.
-
A green checkmark will display if the result is 90% or higher than the top download speed for your internet plan, to indicate that the gateway connection is strong and unlikely to be the cause of a potential connection issue.
-
If the result is less than 90%, we’ll give you some troubleshooting options.
-
The result may be more than 100% in some cases, as Rogers Xfinity Internet plans can support higher speeds when there is additional network bandwidth available.
-
The reported speed may be higher than results from traditional speed tests because it reflects the total speed to the home instead of the speed to a single device, which can be impacted by the device or by WiFi conditions in the home.
-
This feature may not appear or may present an error message depending on your home connection technology or if your gateway is in bridge mode.
-
Next, the tool will test the connection strength to each of the devices on your home network. You’ll get colour-coordinated results that show your connection’s current performance:
-
Green: strong connection
-
Yellow: fair connection
-
Red: weak connection
-
Grey: device is offline or asleep
- Select a device to view whether the WiFi connection is strong enough for different typical online activities. Your results will differ depending on the type of device you’re using (e.g., results for a smartphone will include HD video streaming as an activity, but a smart thermostat would not).
- Select Still having issues for helpful tips to make sure your WiFi is performing at its best.
Note: When installing new Rogers Xfinity WiFi Boost Pods, this test is more likely to show errors during the 24-48 hour optimization period after an Rogers Xfinity WiFi Boost is installed.