Loading...

Easy Setup Guide - Inseego 5G

Setting up your Inseego MiFi X Pro 5G is quick and easy! 

Note:  Make sure your device is powered off before starting the set-up. 

What's Included?

Inseego MiFi X PRO 5G
USB 3.1 Gen 1, type A to C cable

Step 1: Set up with the Inseego Mobile app

Scan the QR code to install the Inseego app from AppStore or Google Play.

A qr code on a white background

Description automatically generated

Follow the in-app instructions to set up your device. 

Use the app to configure and customize your device. 

Step 2: Install a SIM Card

Check if the SIM card was pre-installed by your service provider. If not, follow these steps to insert your SIM.  Note: Make sure the device is turned off before inserting your SIM card. If the device is powered on, remove the plug before proceeding.  

The MiFi X PRO 5G supports only Nano SIM cards. To prevent damage to the SIM slot, please select the correct SIM for this device.

A few sim cards with different colors

Description automatically generated with medium confidence

  • Insert a fingernail at the edge of the battery cover and lift and remove the battery cover. Set the cover aside.

Inseego MiFi X Pro - Insert sim

  • Remove the battery from the battery compartment.

Inseego MiFi X Pro - Insert lift battery

  • Lift the SIM access tab by placing a fingernail underneath the white arrow and lifting the tab up and to the right.

Inseego MiFi X Pro - lift sim tray

  • If necessary, remove the SIM card from the outer card, being careful not to touch the gold-colored contacts.
  • Slide the SIM card into the slot notch first, with the contact points facing down.

Inseego MiFi X Pro - Insert sim card

  • Close the SIM access tab, place the battery in the battery compartment and replace the cover. The SIM card MUST remain in the SIM card slot when in use.

Step 3: Power On

Important: Before you use your device, charge the battery for at least four hours to ensure a full initial charge.

  • To turn your device on, press and hold the Power button for three seconds.

Mifi Turn On

  • To turn it off, press and hold the Power button for three seconds until you see the Powering Off screen. Then select Shutdown and select OK.

Mifi Turn On Buttons

  • Press and release the Power button to wake up the display.

Step 4: Find the WiFi name and password

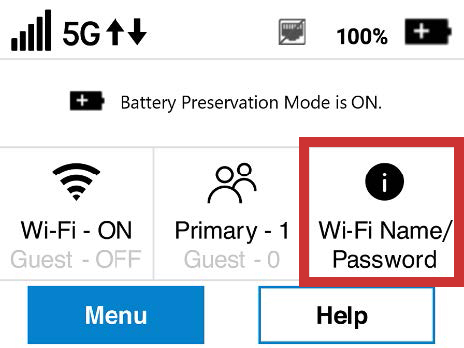
  • After you turn on your device, the Home screen appears.

Mifi Find Wifi - EN

  • Select Wi-Fi Name/Password on the Home screen.
  • The information for your primary network will display. Swipe left to see the information for your guest network.

Step 5: Connect to WiFi

  • The device will broadcast its own wireless network and name.
  • Turn on the device you want to connect.
  • On the device, open the list of available WiFi networks.
  • Select the MiFi primary or guest network and enter the password. Once connected to the internet, the MiFi Home screen displays the connected device.

Step 6: Change WiFi network name and password

  • Make sure your device is connected to the primary network. Open a web browser on your connected device and enter http://my.mifi or http://192.168.1.1
  • Select Sign In in the upper right corner of the screen. You can view your Admin password on the device touchscreen by tapping Help > Admin Website. Note: When you first get your MiFi X PRO 5G, this is the same as your primary network’s password.
  • Select the WiFi option.
  • Select the Primary Network tab.
    • To change your WiFi network name, select the Primary Network Name (SSID) text box and enter the new WiFi name.
    • To change your WiFi password, select the Password text box and enter the new password.
  • Select Save Changes. Once you save the changes, you'll be disconnected from your WiFi network. Connect again using the new network name and password.